This post has already been read 3350 times!
[column-third-1]
Spring 2017 Newsletter
[/column-third-1]
[column-third-2-3]
EXTRA! EXTRA! read the tips we couldn’t fit in the newsletter:
This post has already been read 7717324 times!
Many of us have found that the underfloor LPG tanks have several advantages: efficient storage and economy being two obvious ones. However, whilst touring in Greece in 2012, we were confronted with a major disadvantage – what do you do if you are running low on gas and there is no LPG filling station within a hundred miles or so? Yes I could find service centres with bottles and connections of all shapes and sizes, just no LPG at a pump. Such is the Peloponnesian Peninsular, a wild camping haven, which we had to abandon slightly earlier than planned in order to continue cooling the beer via hook-up. Well the temperature was getting way into the thirties! This also accounted for the fact that our fridge had been working so hard for around three weeks that it had consumed most of the contents of a full LPG tank.
This all set me thinking about my first 2005 Murvi. There was the inconvenience of the small standard gas bottle taking up valuable space in the shower room cupboard, but the advantage of the second tail and regulator for a 907 Camping Gas bottle. Camping Gas is now very expensive of course, but can be easily obtained almost anywhere.
So would it not be possible to rig up a similar system in conjunction with the LPG system of my present Murvi?
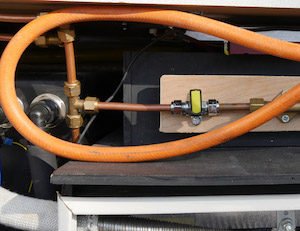
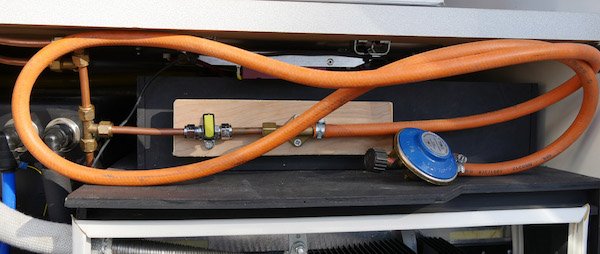
Well yes and it was quite simple really. First turn the gas off! Next cut the fridge supply pipe, where it is easily found behind the nearside rear door, in order to insert an 8mm Tee. Onto the Tee fix an 8mm gas tap and then the correct fitting onto which can be securely attached a length of orange gas hose which terminates at a Camping Gas regulator. I checked that the Camping Gas regulator delivers gas at the pressure which is specified for my fridge. With the main supply turned off I find that the fridge works perfectly from the Camping Gas supply. The whole conversion stores very conveniently in the space behind the hob. (See photograph)
Needless to say, as a DIY job, you must be totally confident about being able to make secure connections!
So how did gas supplies work out when we returned to the Peloponnesian Peninsular in 2017? LPG pumps have certainly increased in number, but we still ran low on gas in a remote area. Our emergency supply worked perfectly and enabled us to stay put rather than having to drive many miles for a fill-up or to find hook-up. Additionally the whole system can be secured inside the van, with the gas bottle sitting on the shower floor, or in the XL, on the kitchen worktop. So it can be left running when parked up in public places with no possibility of interference. I guess the temptation to leave the bottle in the XL rear store should be resisted where there are electrics, but no ventilation.
The full 907 bottle was surprisingly economical even in the high temperatures we experienced. Even with a generous thermostat setting I estimate a full bottle would have kept our largish fridge running for around 8 days.
I should mention that our underfloor tank was never actually empty. We continued to use that limited supply for cooking, but just isolated the supply from the tank to the fridge. However our emergency supply could supply both if need be.
By Vince Wright
Alan York comments:
A slightly simpler solution: Gaslow sell an adapter called a reserve cylinder connection hose. This plugs into the autogas filler and allows
you to fit an adapter at the other end to fit any type of LPG bottle. It
is £18.00 and ideally suited for countries where Autogas is in short
supply or non-existant.
This post has already been read 7715710 times!
You know the scenario – you stop at a motorway services for a coffee. When you turn off the engine, your fridge bleeps at you and you change over to gas. And then, when you drive off for your next stint, you forget to change the fridge back to engine generator and waste gas. Or perhaps when you arrive at your pitch, you put the fridge onto gas until you are settled and hooked-up. And forget to change over to mains.
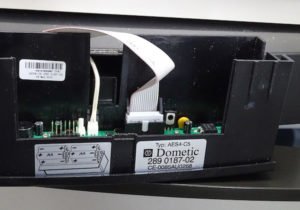
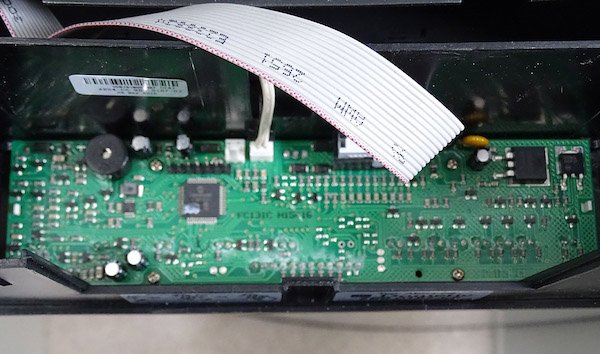
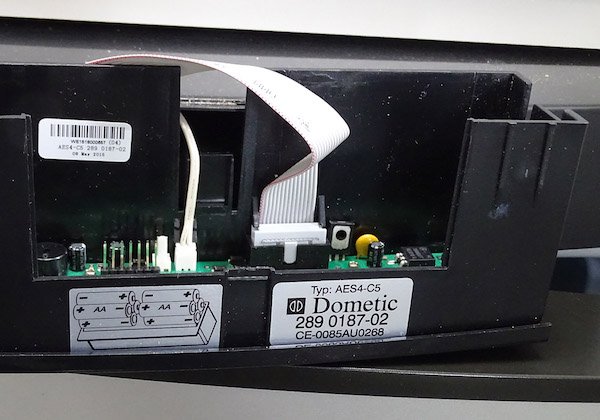
Wouldn’t it be nice if, instead of the Dometic RM8501 that you had fitted, you’d persuaded Rex to fit an automatic RM8505? As it happens, Dometic do a retro-fit automatic panel for the RM8501 to change it to an RM8505. It is a ten-minute exchange job. The new panel looks exactly like the old one, except that there is an extra button with a letter ‘A’ for Automatic. The new panel comes with two ribbon cables already attached – see picture DSC05658. The two-way cable has a thermostat at the end, and the nine-way cable has a connector at the end. I unplugged the hook-up for safety and turned off the fridge. I’m not sure if it was necessary but better safe than sorry. I removed these new cables – they are each held in place by small plastic lugs. It was necessary to loosen – not remove – the four small silver screws that hold the printed circuit board in place. You can see the four screws, but not the lugs, in picture DSC05659. The old panel is held in place on the fridge by three plastic catches. The first needing to be released is under the panel and is a large square one that can be pushed up and the panel gently pulled out. There are then two more catches, one on either side, which need to be pressed in to finally release the panel. The two cables need to be released from the old unit by loosening the four screws and easing the cables out of their plugs. The old cables are then attached to the new unit, the screws tightened and the unit gently slid back into place. Switch on and the gas should fire up. Reconnect the hook-up and the fridge should automatically change over to mains. Start the engine and – Hey! Presto! – the generator will take over.
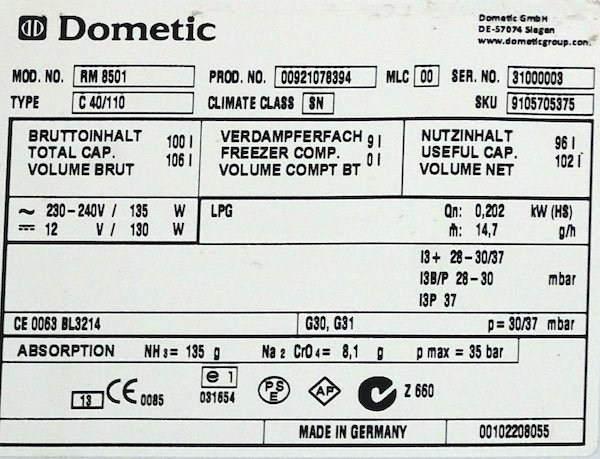
There are several different units, and you need to get the correct one by telling Dometic the product number of your RM8501. You will find this on the info panel at the bottom right of your fridge, behind the salad drawer. In picture DSC05660 you can see the product number of mine at the top – 00921078394. Dometic will supply you with the replacement number of the panel – mine was 2890187020.
I ordered mine from Leisurespares (who will also find the replacement part number for you, if you ask). The price was £137.86 including P&P.

This post has already been read 7713745 times!
Do you find that the fluorescent tubes in the big Heki are more decorative than useful?
MMM and Alan Major have both shown how to replace these tubes with LED tubes, but both methods require you to cut the cables and remove the ballast units. At the Peterborough Show I found a company that has commissioned 12” LED tubes that are straight replacements for the fluorescents, working with the ballast units and without any scary cable cutting. The company can be found at www.ledbulbs4u.co.uk
Replacing the fluorescents is very straightforward. The three perforated plastic trims over the tubes are eased out – they are a push fit. The tubes are pulled out of two clips and the two push-fit connectors at each end are slid off. The new LED tubes are connected in the same way and put into the plastic clips, pointing downwards. A quick switch-on to check that they are working and the perforated trims can be pressed back into position.
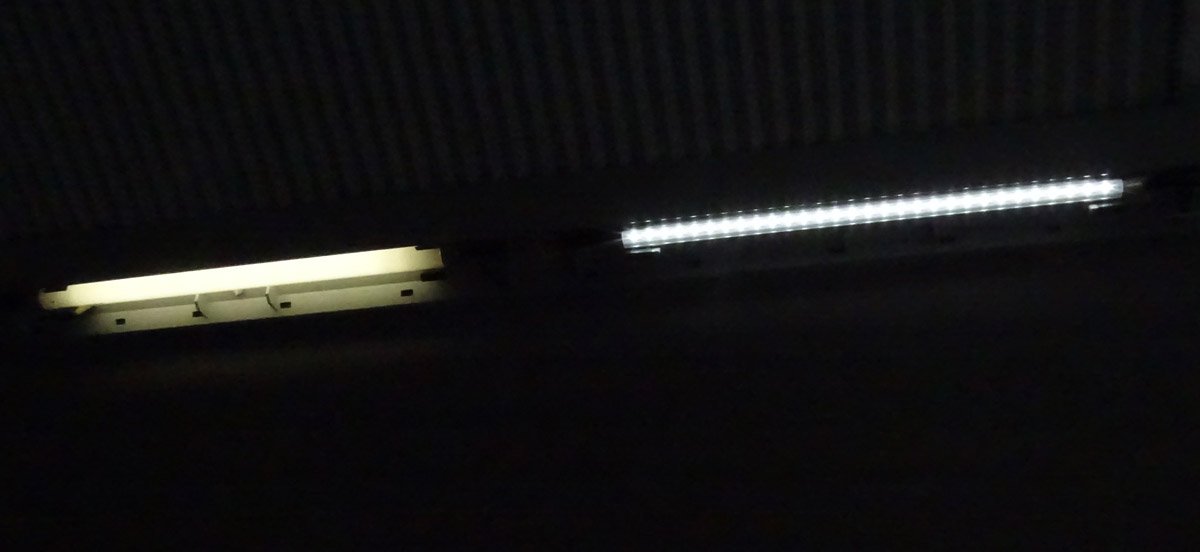
The picture shows the LED tube at the right and the fluorescent tube at the left. The LED tube uses 60% less electricity and is 50% brighter. I had to use the pliers on my Swiss Army Knife to gently crimp the connectors to give a secure grip on the pins on the end of the LED tubes, but that was the only technical activity needed. The tubes are listed at £16.99 each on the website, but at Peterborough they were being sold at £32 for two, so you could try haggling. As far as I know they are the only straight replacement tubes available – the much less expensive ones on Amazon and E-bay need wire-cutting and ballast unit removal.
Vince Wright